Today I received my Sigma DP2 . This is the first in a multi-part review of the camera. Today I'll be focusing mainly on the interface and some initial thoughts. Be sure to subscribe to my blog to get the latest updates.
The Body
The camera is sturdy feeling and completely creak-free. Unfortunately, the buttons on the rear are still labeled with black indentations on black buttons. There are white labels next to the buttons for playback mode. This is contrary to the pre-production photos Sigma released which showed white labels for shooting mode and blue labels for playback mode. Honestly, this isn't a big deal, but it's a first sign of sloppy design from Sigma.

Black-on-Black Buttons... why?
The shutter feel is nice, but the rest of the buttons have a slightly cheap feel to them. They're a bit too springy and don't have the quality haptics of a Canon compact, for example. I guess this is common with compact cameras, but I expected a little better. The manual focus dial has just the right firmness and does not have the problem others have reported about the DP1 where the dial is easy to knock out of place.
The grip is pretty comfortable, although the camera's weight is mostly in the lens, so it will tend to lean a bit to the left. It isn't particularly front-heavy though. Ideally, Sigma would have made the battery larger (we'll see why later) and made the grip part a bit thicker. This wouldn't really add much bulk to the camera since the lens protrudes quite a ways.

The lens extends quite a bit when powered on.
The Interface
The new QuickSet button is a smart way to get access to all the important shooting options quickly. You hit the corresponding arrow key to cycle through the options for each setting.
Hit the button once and you get the following settings (QS1):
|
| ISO
Auto
50
100
200
400
800
1600 (only w/ RAW)
3200 (only w/ RAW) |
|
Flash Mode
Normal
Redeye
Slow Sync
Redeye + Slow Sync. |
 |
Metering Mode
Evaluative
Center Weighted Avg.
Spot |
|
| White Balance
Auto
Daylight
Shade
Overcast
Incandescent
Fluorescent
Flash
Custom |
|
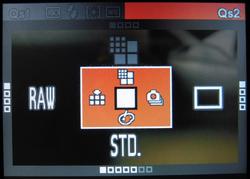
Hit it again for QS2:
|
| Image Size (not available when shooting RAW)
Hi
Wide (16:9)
Med
Low |
|
Image Quality
Fine
Normal
Basic
RAW |
 |
Drive Mode
Single Capture
Continuous
Self Timer 2 sec.
Self Timer 10 sec. |
|
| Color Mode
Standard
Vivid
Neutral
Portrait
Landscape
B&W (not available w/ RAW)
Sepia (not available w/ RAW) |
|
It's nice of Sigma to protect us from poor JPEGs by not allowing us to use in-camera JPEG processing for ISOs 1600 and 3200. These are still created and embedded into the RAW files, but they are not usable. The results from SPP are far better. The fact that you can't shoot B&W or Sepia with RAW files is puzzling. The RAW files do include full-sized embedded JPEG previews, which is nice when browsing images with something like FastStone Image Viewer, which supports X3F files.
While custom WB mode can be selected through QuickSet, you must go through the main menu system to set the custom value. I would have appreciated a quicker way to set white-balance similar to the method used with the SD880 (one press of the print/share button), but it's not as big of a deal since most DP2 users will be shooting RAW.
There are a lot of other nice touches to the interface. The menu can be used in two ways. Closed mode is similar to most other cameras out there: You simply scroll through a list of settings and hit OK to expand and change that setting. Once you've opened up a setting, you switch to expanded mode instead of going to a seperate screen. In expanded mode, you use the 4 main directional keys to select the value and then hit OK to save it. The "zoom" up and down keys on the upper right of the camera back are used to scroll through the different settings. Hitting the display button (lower-right) gets you back to closed mode, which is quicker for scrolling through the list. This took me a little getting used to, but is quite nice.

Closed Mode

Expanded Mode
The menu in shooting mode contains less-used setup-related options like button bindings, bracketing order, auto-rotate, etc. These should really be in a sub-menu, but the cluttered menu is mitigated by the fact that all the important settings are available from the QuickSet system detailed above.
Speaking of setup-options. The DP2 is very configurable. You can set the function of the "zoom" buttons and the L and R arrow keys in each shooting mode (P, S, A, M). By default, the L and R arrows control exposure compensation while the zoom buttons control the main function of the mode you're in (program shift, shutter speed, or aperture). In manual mode, where there is no exposure compensation, the zoom keys control shutter speed while the arrows control aperture. The fact that this is configurable will useful to DSLR users, since competing brands have different ways of handling these controls. Canon SLRs are set up similarly to the DP2 defaults, with the arrow keys being analogous to the round quick-control dial on the SLRs.
You can also control the behavior of the AEL (auto exposure lock) button. By default it just does AEL, but I have it set to Center AF Lock. This can come in handy if you want to take several shots without refocusing. You can also set the button to do both AEL and AFL. You can also pick whether or not you want a half-press of the shutter to perform AE Lock.
Playback mode is also nicely configurable. There is an option to show overexposure warnings, and you can set the OK button to a shortcut. The button can be set to locking/unlocking, marking/unmarking, toggling the exposure warning, or rotating left or right. You can enter playback mode without extending the lens by simply holding the play button for a couple seconds. The camera does have an orientation sensor, which works nicely. Unfortunately you don't get to choose to assign the orientation to files only or to also show portrait-oriented shots sideways. Canon SLRs allow you to do this, which lets you fill the screen with portrait-oriented shots without ending up with unrotated images on your computer. It's a lot easier to turn a camera than it is to turn your monitor. Even most point-and-shoot cameras now make use of the orientation sensor in playback mode to show you the image properly no matter how you're holding the camera. The DP2 lacks this simple feature as well. The most onerous UI mistake on Sigma's part involves zooming in playback mode. A picture is worth a thousand words, so here are a couple thousand words to explain the issue:
View a photo taken in portrait orientation:

Now zoom in...

WHAT THE HELL!?! Why would you not use the rest of the screen? Someone at Sigma needs to get fired. This is fixable in firmware, but it's such a stupid issue that it just amazes me. Another thing you may have noticed about these images is that the LCD is quite ugly. It's decently visible outdoors, but the image quality and colors are poor in any light.
All-in-all, the controls are good for a compact, but they still mostly require looking at a screen and a bit of waiting. The DP2 doesn't have the immediacy of dedicated dials like an R-D1 or the lighting fast menu responses of the leading compacts. This camera makes you take your time, which isn't necessarily a bad thing, but is something you should be aware of.
First Impressions
These are just some random bullet points. Much more detail to come in the next parts of this review.
Good:
- Extremely good per-pixel sharpness (no surprises there)
- Almost no shutter lag once focused
- Great configurability
- Good control scheme for most things (QuickSet, etc.)
Bad:
- LCD is pretty terrible. It's blown away by the SD880s screen.
- AF is still quite slow. There should be an AiAF-type mode where you don't have to pick the point manually.
- Low-light AF is weak. This camera REALLY needs an AF-assist lamp. What was Sigma thinking?
- Some strange or outright wrong UI choices.
Quick Samples
Here are a few very quickly processed (with Sigma Photo Pro) sample shots. They're mostly devoid of photographic merit, but I was really just playing with the settings. Click for full-size versions with EXIF intact.

ISO 3200


